Custom fit configuration widgets#
The silx fit widget allows users to add custom fit theories. A fit theory consists of several components, such as the model function to be fitted, an estimation function…
One of these component is the optional custom configuration widget. This is the dialog widget that is opened when a user clicks the Configure button next to the drop-down list used to select the fit theory or the background theory.
This tutorial explains how to define your own fit configuration widget for your custom fit theories.
Prerequisites#
This tutorial assumes that you are already familiar with
the standard features of silx.gui.fit.FitWidget.
See the Using FitWidget tutorial.
You should also be familiar with adding custom fit theories.
You will find documentation about these subjects by clicking the following links:
silx.math.fit.fitmanager(methods addtheory and addbgtheories)
The widgets we will create in this tutorial are based on the PyQt library. Some knowledge of PyQt is desirable.
Basic concepts#
Modal window#
A fit configuration widget should be a modal dialog window, so that when a user opens the dialog to modify the configuration, the rest of the program is frozen until all the configuration parameters are properly defined. The program usually resumes when the user clicks the Ok or the Cancel button in the dialog.
The widget must implement a number of methods and attributes to be used as a dialog by FitWidget:
standard QDialog methods:
show(): should cause the widget to become visible to the user)
exec(): should run while the user is interacting with the widget, interrupting the rest of the program. It should typically end (return) when the user clicks an OK or a Cancel button.
result(): must returnTrueif the new configuration is to be accepted (OK clicked) orFalseif it should be rejected (Cancel clicked)an additional output attribute, a dictionary storing configuration parameters to be interpreted by the corresponding fit theory.
an optional setDefault method to initialize the widget values with values in a dictionary passed as a parameter. This will be executed first.
The first 3 methods can be automatically defined by inheriting QDialog.
Associate a dialog to a theory#
After defining a custom dialog widget, it must be initialized and associated with a theory.
A fit theory in FitWidget is defined by a name. For example,
one of the default theories is named “Gaussians”.
So if you define a configuration dialog MyGaussianConfigWidget to define
configuration parameters understood by this theory, you can associate it the following
way.
fw = FitWidget()
my_config_widget = MyGaussianConfigWidget(parent=fw)
fw.associateConfigDialog(theory_name="Gaussians",
                         config_widget=my_config_widget)
Example#
The following example defines a very basic configuration dialog widget with a simple text entry in which the user can type in a floating point value.
The value is simply saved in a dictionary attribute
CustomConfigWidget.output. FitWidget will look-up this dictionary
and pass it to the theory’s custom configuration function, fitconfig().
The configuration function essentially updates the CONFIG dictionary
used by our fit function to scale the y values.
from silx.gui import qt
from silx.gui.fit import FitWidget
from silx.math.fit.fittheory import FitTheory
from silx.math.fit.fitmanager import FitManager

app = qt.QApplication([])

# default fit configuration
CONFIG = {"scale": 1.0}

# define custom fit config dialog
class CustomConfigWidget(qt.QDialog):
    def __init__(self):
        qt.QDialog.__init__(self)
        self.setModal(True)
        self.scalingFactorEdit = qt.QLineEdit(self)
        self.scalingFactorEdit.setToolTip(
            "Enter the scaling factor"
        )
        self.scalingFactorEdit.setValidator(qt.QDoubleValidator(self))

        self.ok = qt.QPushButton("ok", self)
        self.ok.clicked.connect(self.accept)
        cancel = qt.QPushButton("cancel", self)
        cancel.clicked.connect(self.reject)

        layout = qt.QVBoxLayout(self)
        layout.addWidget(self.scalingFactorEdit)
        layout.addWidget(self.ok)
        layout.addWidget(cancel)

        self.old_scale = CONFIG["scale"]
        self.output = {}

    def accept(self):
        self.output["scale"] = float(self.scalingFactorEdit.text())
        qt.QDialog.accept(self)

    def reject(self):
        self.output["scale"] = self.old_scale
        qt.QDialog.reject(self)

# our actual fit model function
def fitfun(x, a, b):
    return CONFIG["scale"] * (a * x + b)

# fit configuration
def fitconfig(scale=None, **kw):
    """Update global config dict CONFIG"""
    if scale is not None:
        CONFIG["scale"] = scale
    return CONFIG

# synthetic test data a=2, b=3
x = list(range(0, 100))
y = [fitfun(x_, 2, 3) for x_ in x]

# register our custom fit theory
fitmngr = FitManager()
fitmngr.setdata(x, y)
fitmngr.addtheory("scaled linear",
                  FitTheory(
                      function=fitfun,
                      parameters=["a", "b"],
                      configure=fitconfig))

# open a fitwidget and associate an instance of our custom
# configuration dialog to our custom theory
fw = FitWidget(fitmngr=fitmngr)
fw.associateConfigDialog("scaled linear", CustomConfigWidget())
fw.show()

app.exec()
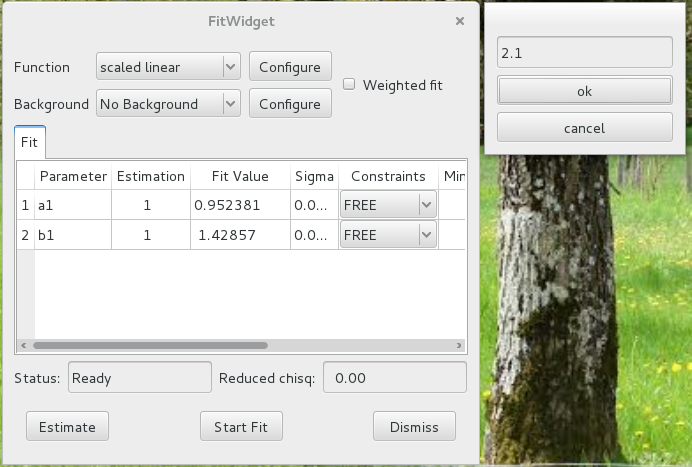
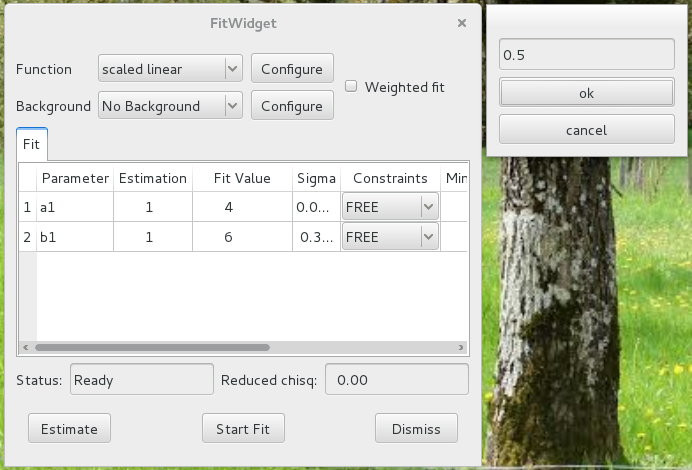
Screenshot |
Description |
|---|---|
|
If the default value of 1.0 is used, the fit finds a=2 and b=3 as expected. |
|
Setting a scaling factor of 2.1 causes the fit to find results that are less than about half of the normal expected result. |
|
A scaling factor of 0.5 causes the fit to find the values to be double of the ones used for generating the synthetic data. |